LTER Photo Upload Guide
Overview:
The Long Term Ecological Research Network operates in twenty-six incredible locations dispersed across the globe. The LTER Network Office relies on researchers and site personnel to capture photos that capture the beauty of these sites, as well as photos that show what kinds of activities occur at sites across the network. The Network Office runs a smugmug.com account that allows people across the network to upload, view, and download images associated with LTER sites.
The link to the smugmug account is: https://lternetwork.smugmug.com/
Site Access:
The LTER SmugMug website is publicly visible. However, only users with upload links can upload photos to galleries. Uploaded photos are also publicly available to download.
Photo Use Agreements:
Photos uploaded to the LTER SmugMug are made available for public use through the CC By-SA 4.0 license. This license lets others distribute, remix, tweak, and build upon your work (even commercially), as long as you are credited for the original creation. This is the most accommodating of licenses offered, and is recommended for maximum dissemination and use of licensed materials.
Uploading photos:
The LTER Network Office encourages users to upload their own photos to each site’s respective gallery. We encourage users to upload photos that are unique, visually stunning, tell a unique story, or highlight research personnel in action. The Network Office has a low capacity for curating galleries, so we encourage users to be selective with their uploads. For example, select the best photo or two from a sequence of photos displaying an activity, or pick a great landscape or two from a day of work. However, we do rely on you to upload photos, so if you have a lot of great, unique photos, don’t hesitate to share them!
Upload Instructions:
- Update photo caption. Please add a short description of each photo before you upload them to smugmug. For instructions on updating captions, follow the links below:
- Please include a brief description of the location and activity in the caption. Also include the photographer’s name!
- Follow link below to the gallery specific upload page.
- Drag photos into the box, or select from your computer.
- Click upload.
LTER Site Photo Upload Links
- Andrews LTER
- Arctic LTER
- Baltimore Ecosystem Study LTER
- Beaufort Lagoon Ecosystems LTER
- Bonanza Creek LTER
- California Current Ecosystem LTER
- Cedar Creek LTER
- Central Arizona Phoenix LTER
- Coweeta LTER
- Florida Coastal Everglades LTER
- Georgia Coastal Ecosystems LTER
- Harvard Forest LTER
- Hubbard Brook LTER
- Jornada LTER
- Kellogg Biological Station LTER
- Konza Prairie LTER
- Luquillo LTER
- McMurdo LTER
- Minneapolis-St. Paul LTER
- Moorea Coral Reef LTER
- Niwot Ridge LTER
- North Temperate Lakes LTER
- Northeast Shelf LTER
- Northern Gulf of Alaska LTER
- Palmer LTER
- Plum Island LTER
- Santa Barbara Coastal LTER
- Sevilleta LTER
- Shortgrass Steppe LTER
- Virginia Coast Reserve LTER
LTER Network Office - 2016-Andrews-Forest-Site-Visit - profile-pictures
Photo Caption Instructions
Apple Photos
- Add all the photos you want to upload to Apple photos. They can be dragged and dropped into the app, or uploaded via File > Import
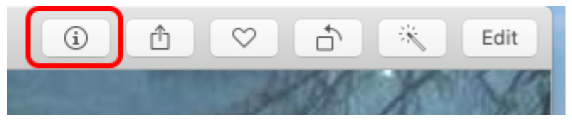
- Create a caption for each photo. First, click the “i” logo in the top right corner near the search bar.
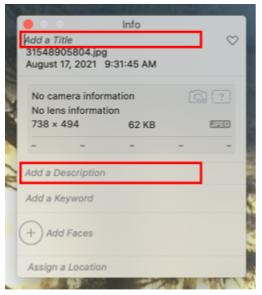
- In the window that appears, fill out the Add a title and Add a description fields. These are automatically recognized by SmugMug.
- Export photos with the new, updated descriptions. Files MUST be re-exported to encode the information you just added into the file. Highlight all photos ready for upload then click File > Export > Export (1) Photo. Any standard photo format works, but be sure to select “Include Title, Keywords, and Description”.
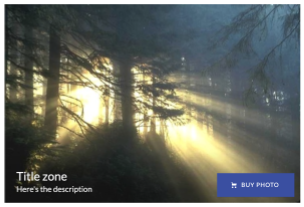
- Upload photos to SmugMug following the instructions above. The title and captions appear like the photo below.
Windows Photos
- Follow the instructions at this link to edit each photo’s metadata.
- Edit the Title and Description fields for the photos.
- Export photos and upload to smugmug.
Lightroom
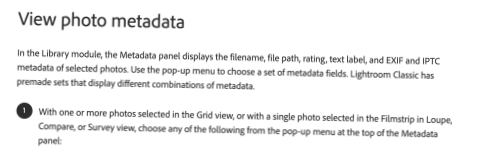
- View photo metadata (instructions from Adobe’s help website):
- Then select “Quick describe”
- Update Title and Caption fields.
- Export photos with updated metadata.
- Upload to SmugMug